
The Real Estate Photo Edit Pack: Every Standard Fix in One Click (2026)
Every property shoot needs the same four corrections on every frame. Here is the standard real estate edit list, the order it runs in, and how to automate it.
Munib Ali Laghari
Founder & Lead Developer
Quick answer
What are the standard edits for real estate photos?
Four corrections cover nearly every frame: straighten leaning walls, reduce interior noise, fix the color cast from mixed daylight and indoor bulbs, and restore the green the sun washed out of the lawn. Blown-out windows need a fifth. EnhanceCraft’s real estate edit pack chains all of them into one job, on one photo or a full shoot.
Before
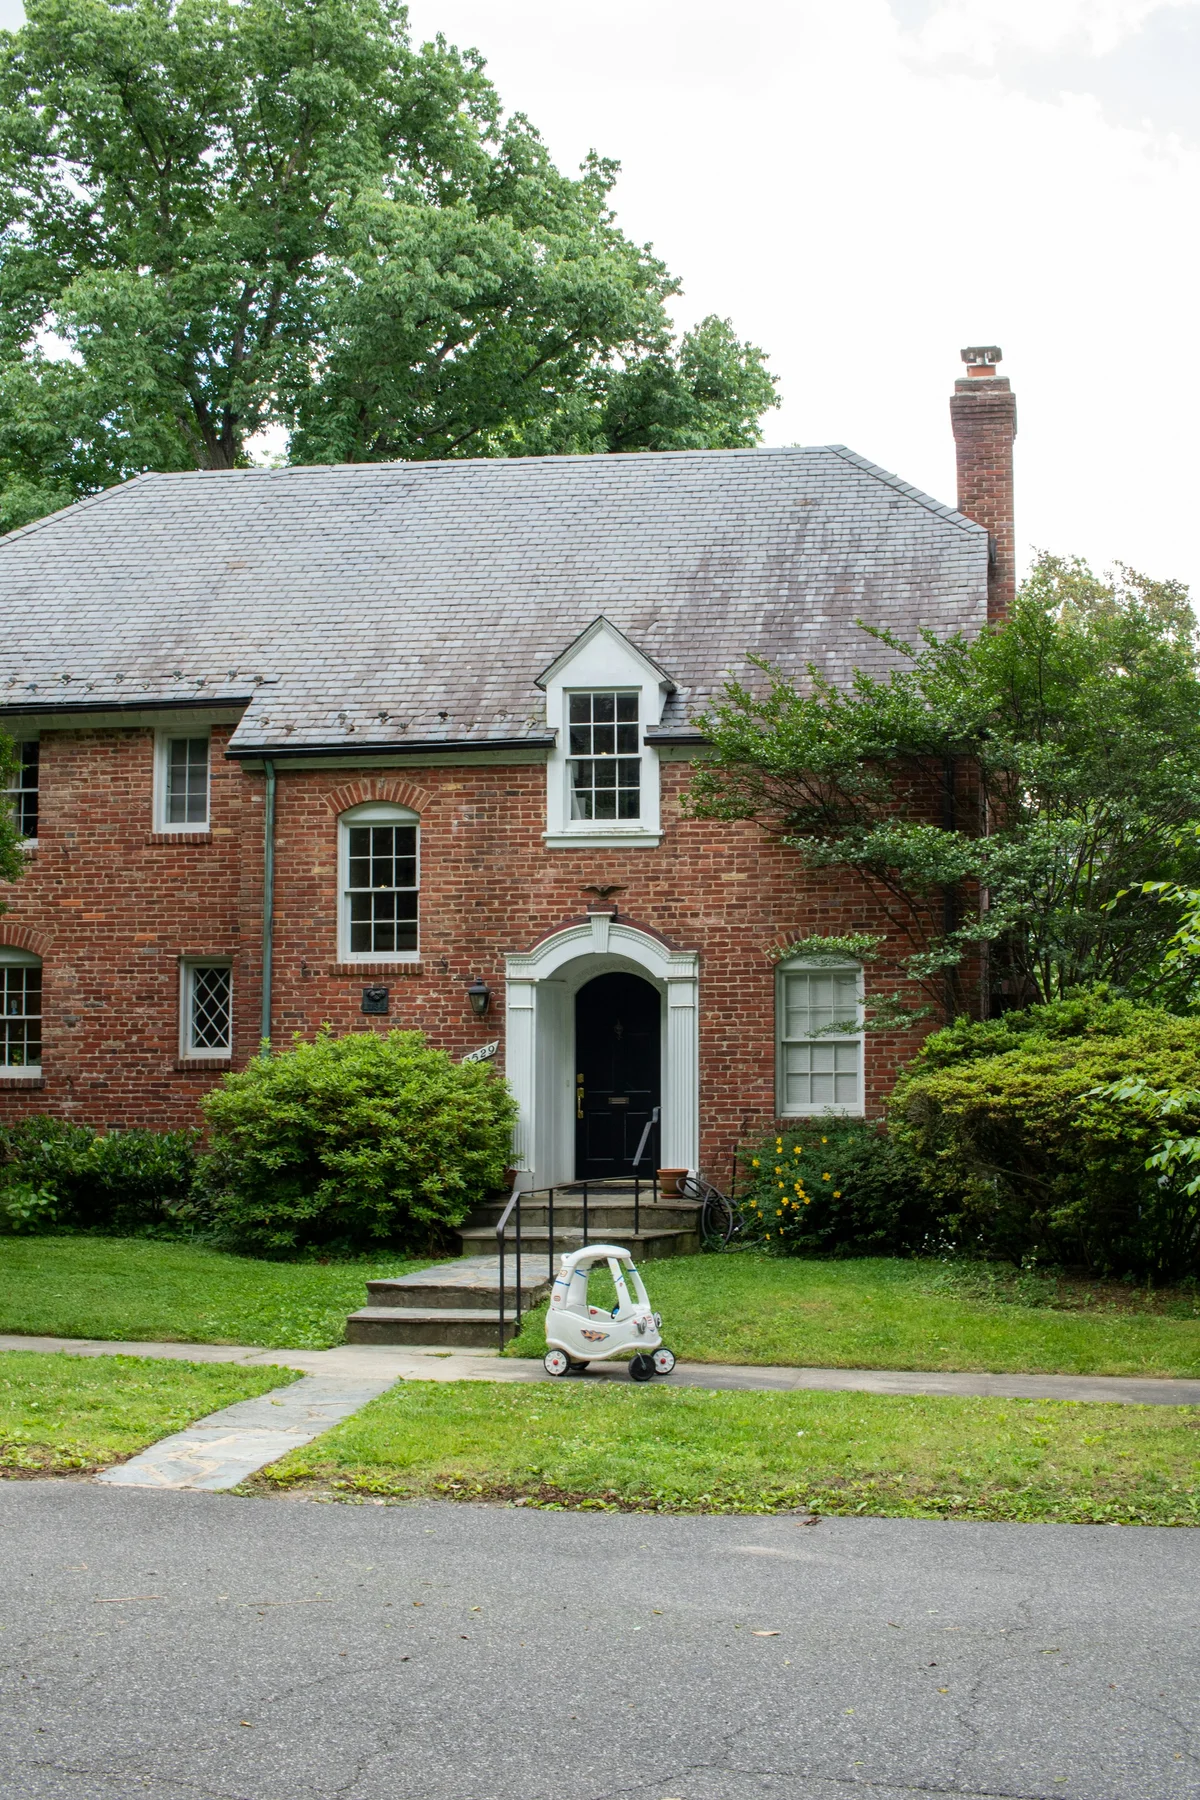
After
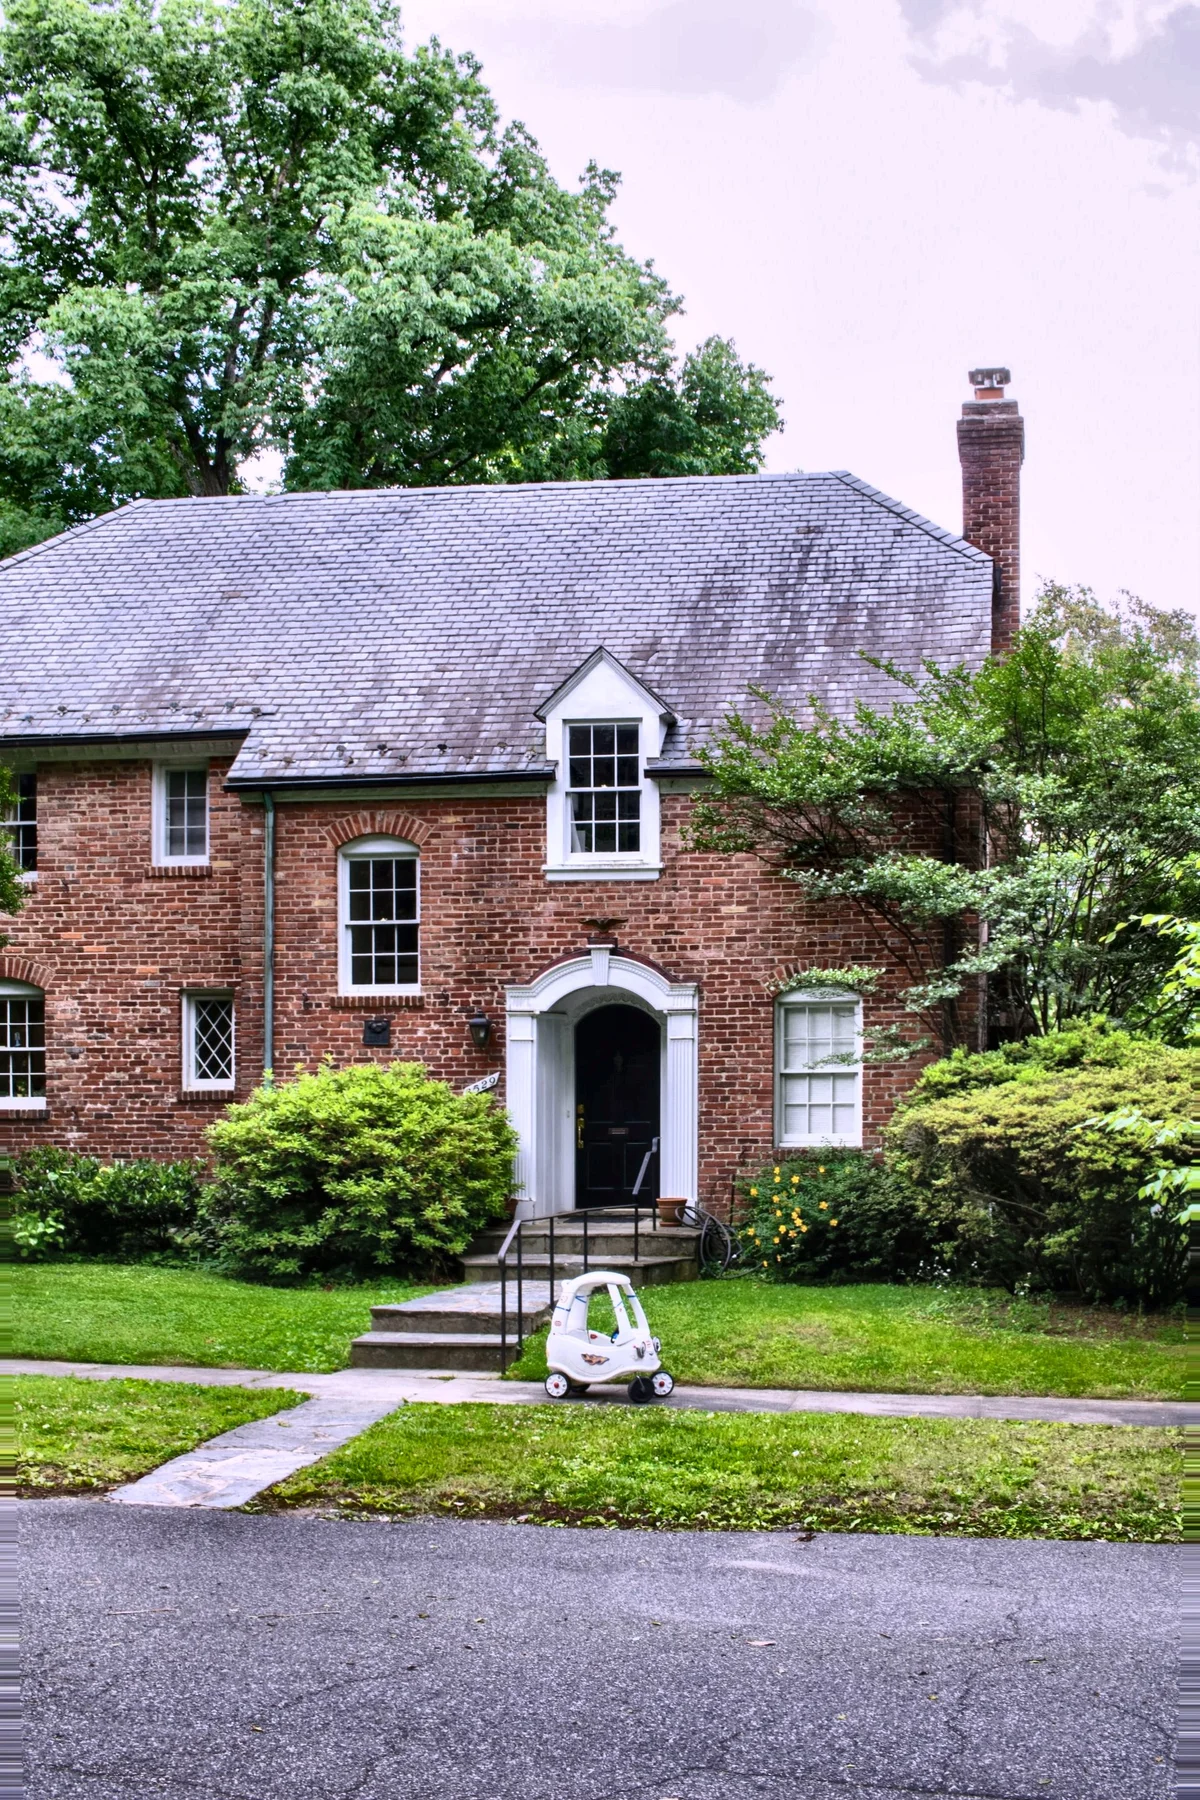
More examples like this: browse before & after results across every tool.
Every property shoot hands you the same four problems. The walls lean inward, because you shot wide and tilted slightly up to get the ceiling in. The interiors are grainy, because you were handheld in a dim hallway. The color is fighting itself, because daylight through the window and warm bulbs overhead do not agree about what white is. And the lawn looks half dead, because midday sun flattens the color out of grass.
Then you open the next frame and do all four again. And the frame after that.
This guide is the standard edit list for real estate photography: what each correction actually fixes, the order they have to run in and why that order matters, which edits are corrections and which are choices you may have to disclose, and how to apply the whole set to an entire property shoot in one job instead of one frame at a time.
What Counts as a "Standard" Real Estate Edit
The standard edits are the corrections that fix what the camera got wrong, rather than changing what the property looks like: straighten leaning walls, reduce interior noise, remove the color cast from mixed light, and restore the green the sun washed out of the lawn. Blown-out window recovery is the common fifth, and it belongs in a different category.
What makes these four standard is that the house never causes them — the equipment and the conditions do. A wide lens tilted up will converge verticals in any room. A dim interior will force high ISO in any house. Two light sources with different color temperatures will split the white balance on every listing you ever shoot. Which is why the list barely changes from property to property:
| Correction | What it fixes | Why nearly every frame needs it |
|---|---|---|
| Perspective correction | Walls and door frames leaning inward, plus wide-angle bend | Interiors are shot wide and often tilted up, which makes parallel verticals converge |
| Noise reduction | Grain and color speckle in shadows and corners | Dim interiors force high ISO or slow shutter speeds, especially handheld |
| White balance | The orange-and-blue split from daylight plus indoor bulbs | No single camera setting can satisfy two light sources at once |
| Lawn enhancement | Grass reading yellow-grey, flat, and patchy | Overhead midday sun desaturates vegetation more than any other subject in the frame |
| Window pull (optional) | Windows clipped to featureless white | The view outside is several stops brighter than the room |
Why the Standard Fixes Are a Pipeline Problem, Not a Craft Problem
Four corrections applied to every frame in a gallery is not four edits — it is four times however many photos the listing runs. On a 25-image set that is 100 individual adjustments, and almost none of them require a decision. Straightening a wall is not a judgment call; the wall is either plumb or it is not.
That distinction is the whole argument for automating this layer. Real editorial judgment in property photography happens before the shutter and at the gallery level: which rooms to shoot, from which corner, in what order the buyer sees them, which frame leads. The corrections underneath are deterministic — the same operation, the same direction, every time — and repetitive work with no judgment in it is exactly what should not be done by hand 100 times a night. Automating the corrections does not deskill the shoot; it moves your attention back to the parts that actually need you.
Fix 1: Straighten the Geometry
Perspective correction squares up the verticals that a tilted wide-angle lens made converge, and flattens the barrel bend that makes straight walls curve near the frame edge. It matters more in property photography than anywhere else, because a room's credibility rests on its geometry — leaning walls read instantly as amateur, and they subtly make a space look like it is falling away from the viewer.
The correction warps the frame, so the edges get trimmed to keep a clean rectangle. Leave a little breathing room around the subject when you shoot and you will not lose anything you needed. The full mechanics are in our guide to fixing perspective distortion.
Fix 2: Clean the Noise Before You Touch Color
Noise reduction comes second because every correction after it amplifies whatever grain is left. Interiors are shot in low light, so shadows and corners fill with luminance grain and color speckle, and both get louder the moment you lift shadows, add contrast, or push saturation.
There is a specific failure mode here worth knowing: chroma noise — the colored speckle in dark areas — also skews an automatic white balance estimate, because the algorithm is reading colors that were never in the room. Denoise first and the color correction that follows has clean data to work from. Our AI denoising guide covers how detail survives the process.
Fix 3: Balance the Mixed Light
White balance correction neutralizes the color cast that mixed lighting bakes into interior shots — the warm orange of tungsten and LED bulbs against the cool blue of daylight through a window. Cameras pick one setting for the whole frame, so one of those two sources always renders wrong, and white walls come out either amber or faintly blue.
The correction re-neutralizes the overall cast and evens out the contrast so bright windows and dark corners both hold detail. This is also the single edit that most affects perceived cleanliness: buyers read a neutral white wall as clean and a yellow one as dated, even when it is the same wall.
Fix 4: Bring the Lawn Back Without Touching the Sky
Lawn enhancement restores saturation and depth to grass and foliage specifically, leaving everything else in the frame alone. Overhead sun at midday — when most exterior shots get taken, because that is when the appointment was — desaturates vegetation harder than any other surface, so a healthy lawn photographs yellow-grey and tired.
The reason a targeted correction beats a global saturation boost is what a global boost does to the rest of the shot: brick goes orange, the sky goes cartoon blue, and roof tiles turn purple. Enhancement here only touches green vegetation, so the sky, brick, and roof come out exactly as photographed.
The Optional Fifth Fix: Blown-Out Windows
Window recovery is optional because it is not always needed and, unlike the other four, it does not correct an error — it adds information the camera never captured. A single interior exposure cannot hold both a lamp-lit room and a sunlit garden, so the glass clips to pure white with nothing behind it to recover.
Add it when the windows are a visible distraction in an otherwise good interior; skip it when the windows are small, already readable, or when the view is a genuine selling point you should bracket for real. Turning the preset on costs 2 extra credits per image, and our window pull guide covers the honesty rules that come with a synthesised view.
Why the Order Matters
The corrections run geometry first, then noise, then color, then the targeted lawn boost, then export — and that sequence is not arbitrary. Each step either changes the pixel grid or reads the pixel values, and doing them out of order means later steps work from data the earlier ones invalidated.
- ●Geometry before everything, because warping resamples every pixel. Warp after color work and you resample already-processed pixels; warp after cropping and your framing shifts.
- ●Noise before color, because contrast and saturation multiply grain, and chroma noise corrupts an automatic white balance reading.
- ●Color before the lawn, so the targeted green boost is applied to already-neutral color instead of stacking on top of a cast.
- ●Export last, as high-quality JPG, so compression happens once at the end rather than being re-applied at every stage.
Run by hand, keeping that order straight across a whole shoot is where mistakes creep in — you fix the walls on frame 12 after grading it, and the crop no longer matches frames 1 through 11.
How to Run the Whole Pack in One Click
The real estate photo editor chains all of it into a single job, in the browser, with nothing to install:
- 1.Upload the property photo, or the full set in bulk. Upload an interior or exterior shot — or the whole shoot in bulk mode, where one job covers 25, 100, or 500 images depending on your plan.
- 2.Choose the standard pack, or add window pull. The standard pack runs perspective correction, noise reduction, white balance, and lawn enhancement. Toggle the With Window Pull preset for bright interiors where the glass has clipped to white.
- 3.Download listing-ready JPGs. Every correction is applied in the right order and exported as high-quality JPG sized for MLS and listing portals. The standard pack costs 3 credits per image and the window-pull version 5 — both cheaper than running the same corrections one at a time, and a free account includes 25 credits to start, then 10 every month.
What the Pack Deliberately Does Not Do
The pack stops at corrections. Sky replacement, day-to-dusk conversion, and virtual staging are deliberately not in it, because none of them fix a camera error — each one changes how the property is presented, which makes it a decision you should make per photo rather than a default applied to a whole shoot.
- ●Sky replacement swaps a flat grey sky for a clear one. Reasonable on an overcast day, wrong when the new sky's light direction contradicts the shadows on the house.
- ●Day-to-dusk turns a daytime exterior into a twilight hero shot. Powerful as the lead image, absurd applied to all 25 frames.
- ●Virtual staging furnishes an empty room. Genuinely useful for vacant listings, and the edit with the strictest disclosure rules attached.
Keeping these separate from the standard pack is a workflow decision, but it is also a compliance one — which is the next section.
Corrections vs. Alterations: Where the Disclosure Line Falls
Ordinary corrections and property alterations are treated differently, and the line falls almost exactly where the standard pack ends. Fixing exposure, color, noise, and geometry is understood as processing the photograph. Adding, removing, or changing physical elements of the property is understood as altering it — and that is what disclosure rules address.
California's Assembly Bill 723, effective January 1, 2026, is the clearest statement of it: a licensee must disclose listing images digitally altered to add, remove, or change physical elements of a property, and make the unaltered original available alongside them — while ordinary exposure and white-balance corrections are exempt. Read against our list, the four standard corrections sit on the exempt side; window pull, sky replacement, and virtual staging do not.
The practical rule for 2026: run the standard corrections freely on every frame, and treat every alteration as something you label and keep the original for. That retention duty, and the two other changes that reshaped this job in 2026, are covered in what actually changed in real estate photography. That is consistent with the broader professional standard too — the NAR Code of Ethics requires members to present a true picture in their advertising and marketing, and check your own MLS and state rules, which vary and are still moving.
Run the Whole Property Set in One Batch
Consistency across a gallery matters more than perfection on any single frame, because buyers scroll a set and notice the frame that does not match. Bulk mode applies one preset to the entire shoot, so the geometry, color, and lawn treatment are identical from the kitchen to the back yard.
Run one representative image first — ideally your hardest interior, with mixed light and a bright window — check it, then commit the rest of the set. Verifying on one before batching 25 is the habit that separates a fast night from a re-run.
Before You Upload to the MLS
Check four things on the finished set rather than on each individual export. It takes a minute and catches almost everything that gets a listing gallery kicked back or looking sloppy:
- ●Verticals actually plumb, especially on frames where you leaned back to fit the ceiling in.
- ●Color consistent room to room — if one bedroom skews warmer than the rest, it will read as a different house.
- ●Windows either recovered or honestly bright, never half-recovered with a grey halo around the frame.
- ●Your MLS's own file rules, since size, dimension, and format limits differ by board and portal — confirm against your MLS's current spec rather than a generic number. The MLS photo requirements checklist covers what the rulebooks actually say, and the twelve things to check before you upload.
The Fixes Are Standard, So Stop Doing Them by Hand
Real estate photography is unusual in how predictable its post-processing is. The same lens behavior, the same lighting conflicts, the same overhead sun, shoot after shoot — which means the corrections are known before you have even opened the files. Work that is knowable in advance is work you should be able to hand off.
Try the free real estate photo editor — a free account includes 25 credits to start, then 10 every month, the standard pack costs 3 credits per image, and pay-as-you-go credits never expire. It fits into the full real estate workflow alongside the specialty edits, and every part of it runs in the EnhanceCraft AI image toolkit without installing anything. Spend the evening choosing the lead photo instead of straightening walls.
Found this helpful?
Share it with your network
Ready to try it yourself?
25 free credits to start, then 10 every month. No credit card. Process your first image in under 15 seconds.
Try the Real Estate Photo Enhancer freeMunib Ali Laghari
Founder & Lead Developer · EnhanceCraft
Munib Ali Laghari is the founder and lead developer of EnhanceCraft, an AI image toolkit. He writes about AI upscaling, photo restoration, and background removal. Connect on LinkedIn